


Photo by Silas Köhler on Unsplash
Integrate Github OAuth with Supabase and a Vue 3 + TypeScript + Pinia application
Comprehensive, step-by-step guide


Table of contents
- Preface
- Supabase project configuration
- Registering our Github OAuth application
- Entering Github credentials to the Supabase project
- Preparing our Vue 3 app
- Designing a Pinia authentication store
- Creating a Sign in page
- Loading user data in our app
- Creating a minimalist User Profile view
- Writing a global authentication route guard
- Signing out of the app
- BONUS - custom redirects upon successful login
- Plan A - taking advantage of Supabase's redirectTo option
- Plan B - expanding the store and using Pinia's $onAction method
- IT'S A WRAP! - Github repo link
Hello and welcome to my first tutorial post of 2022! My name is Mac, and in this post I'll take over from the narrator of Mac's WEBlog. While he's busy cooking up Episode 2, I in the meantime will teach you how to:
- Create and configure a Supabase project to use a third-party authentication provider (in this case Github)
- Set up and use a Supabase client to authenticate via said provider in a Vue 3 x TypeScript app
- Design a Pinia store complete with proper getters and methods to manage the authentication state
- Write a route guard in order to prevent users from visiting certain pages without signing in first
- Code signing out of the app
Now, in case you're not familiar with Supabase - it's a service which allows one to create a backend with a fully fledged PostgreSQL database supercharged with realtime data update subscriptions, as well as an API generator, and what we'll take a look into in this post - authentication module.
Preface
This article assumes you've already created a Github account and you're familiar with this platform as well as Vue 3, and TypeScript. Obviously, I'm not talking intimate knowledge of their inner workings or some kind of obscure features, but I highly doubt you'll get through this tutorial without learning at least the very basics and fundamentals of these tools. In any case, look no further than their respective docs.
What is also worth pointing out, is that this application serves only a as demo. It was never streamlined for production and it certainly will get outdated along with its dependencies as the time goes on. I may set up Dependabot to automatically bump their versions, but I won't be able to maintain that particular demo app forever. I could, on the other hand, just do a rewrite of this article and overhaul the app itself should certain breaking changes be introduced, though it's not a 100% guarantee either.
With that out of the way, let's just dive straight into it, shall we?
Supabase project configuration
First of all, go to https://app.supabase.io/ and sign in with Github. Once you've logged in, click the New project button and choose the USERNAME's Org (or whichever one you prefer, it doesn't actually matter here). Fill in the project creation form like below (you can change the region to one that's closest to you geographically and set any password you want, just make sure the latter is strong)
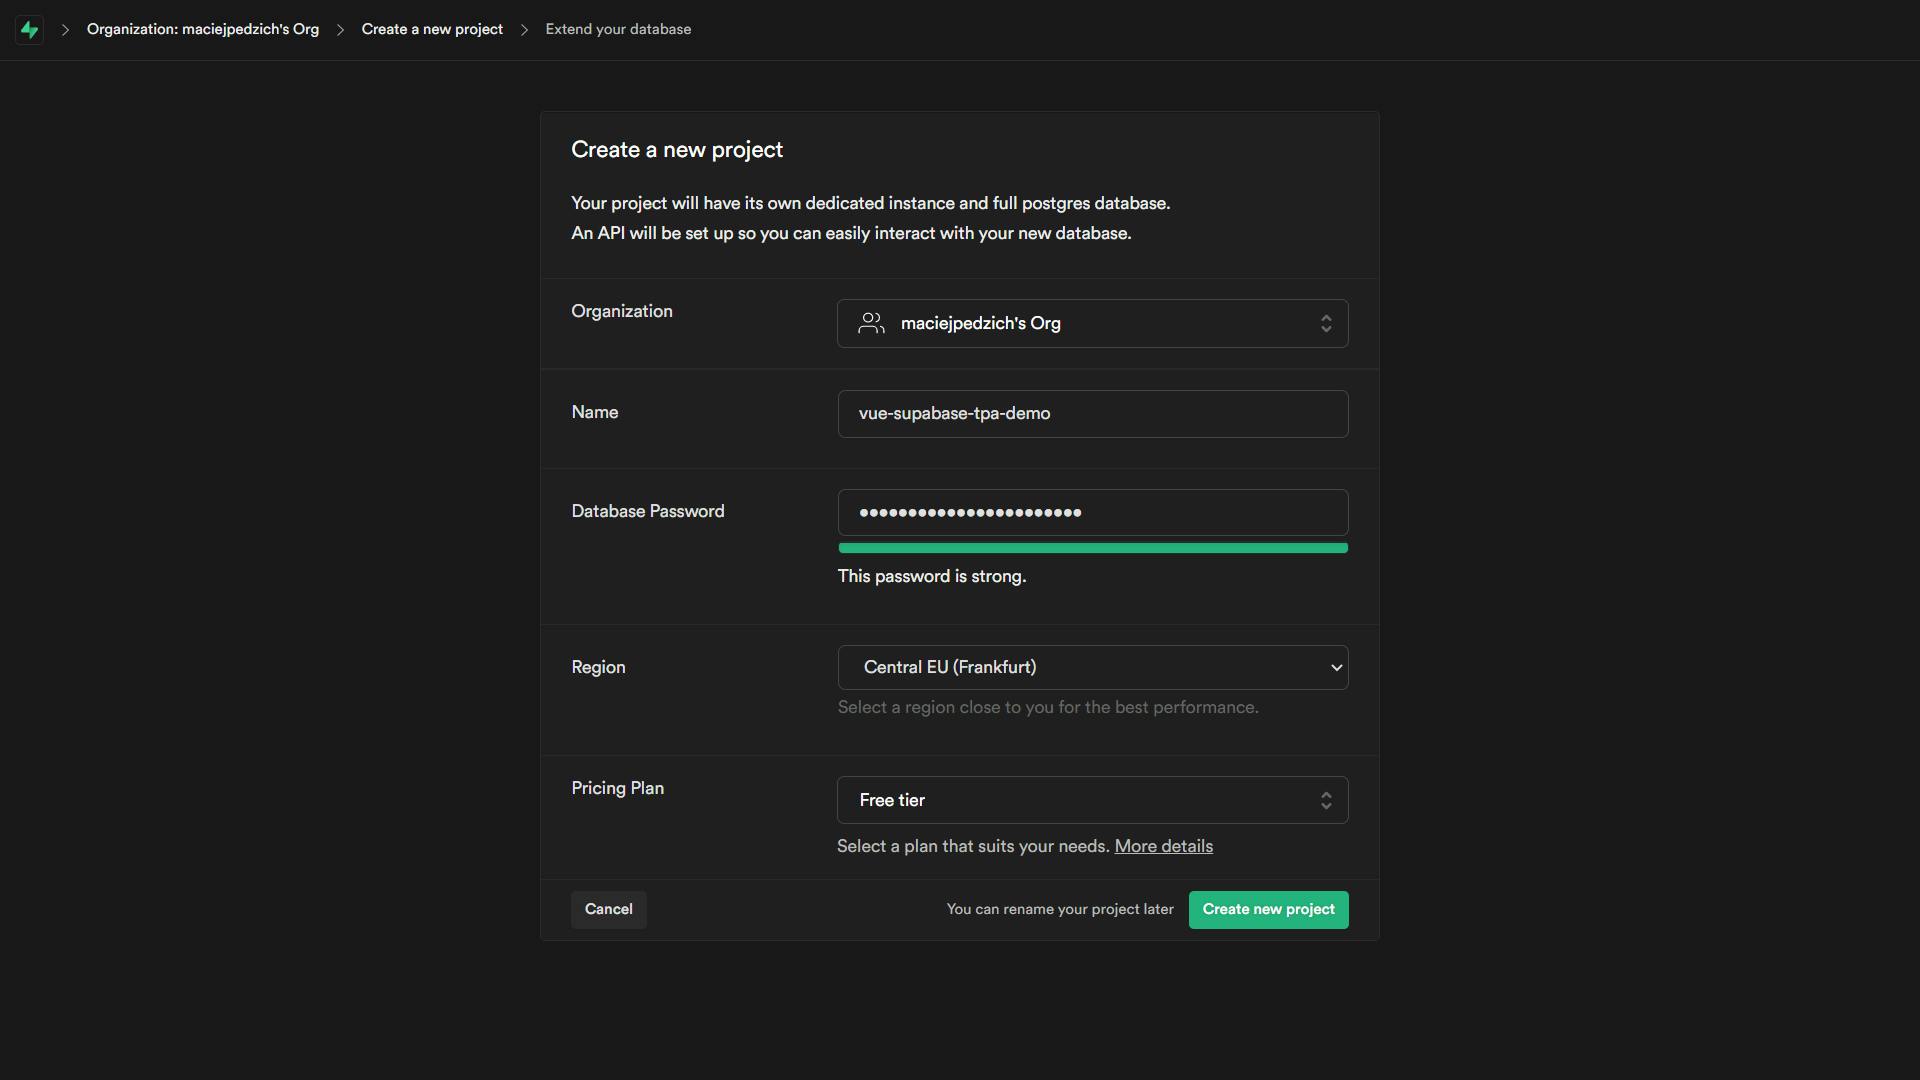
... and smash that follow button on Mac's WEBlog... uh... I mean, Create new project, yeah. If everything goes fine, you should be taken to your brand new project's dashboard page. You may also need to wait a couple minutes for the setup to complete, so while Supabase is working hard on laying the groundwork, let's move on to:
Registering our Github OAuth application
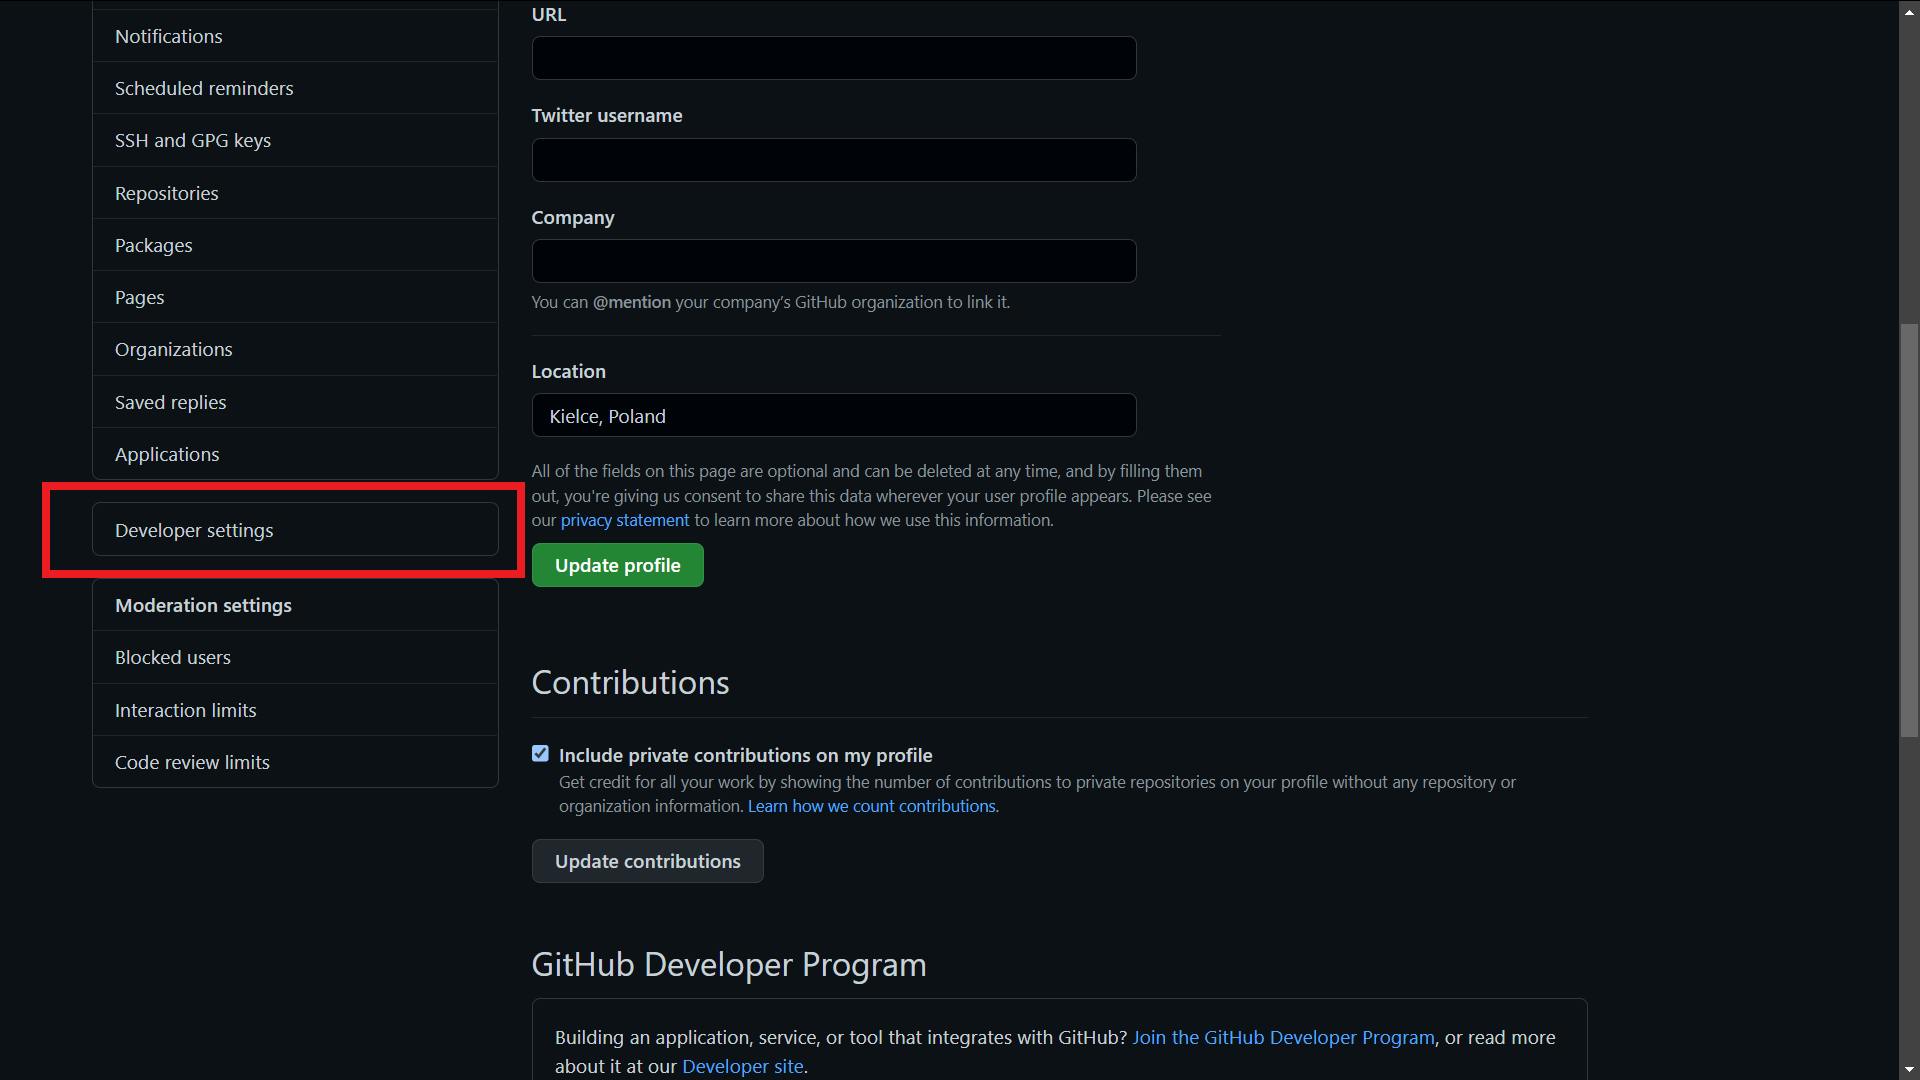
Open your Github profile's settings and scroll down to find the Developer settings tab on the left-hand side. It should be right under the Applications tab and right above the Moderation settings, just like in the screenshot below.
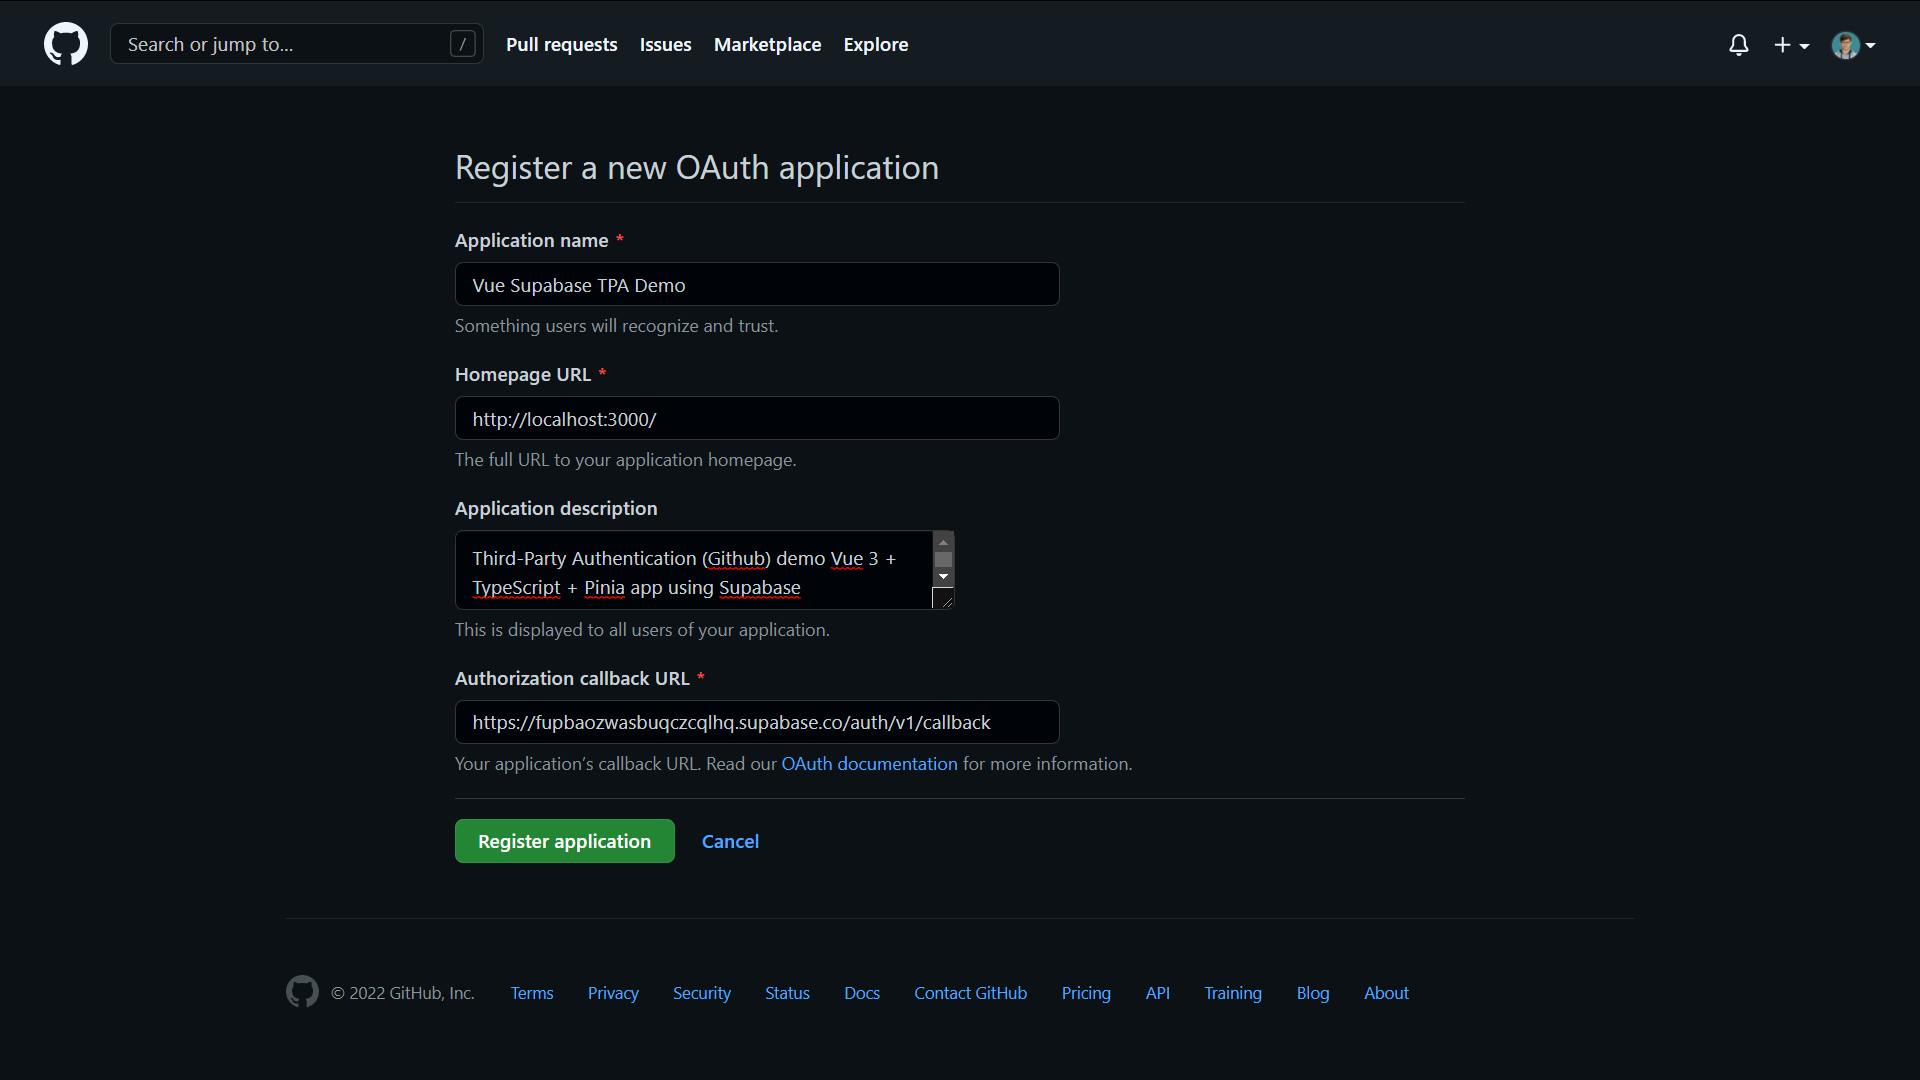
Now choose OAuth Apps and click the New OAuth App button on the right-hand side. You can specify any application name, homepage URL and description you want, but the authorization callback URL has to taken from the Supabase project we created moments ago. Speaking of which, I'm pretty sure it has been properly initialised, so let's head back to the dashboard. If you scroll down, you should see a Project Configuration box with a URL section.
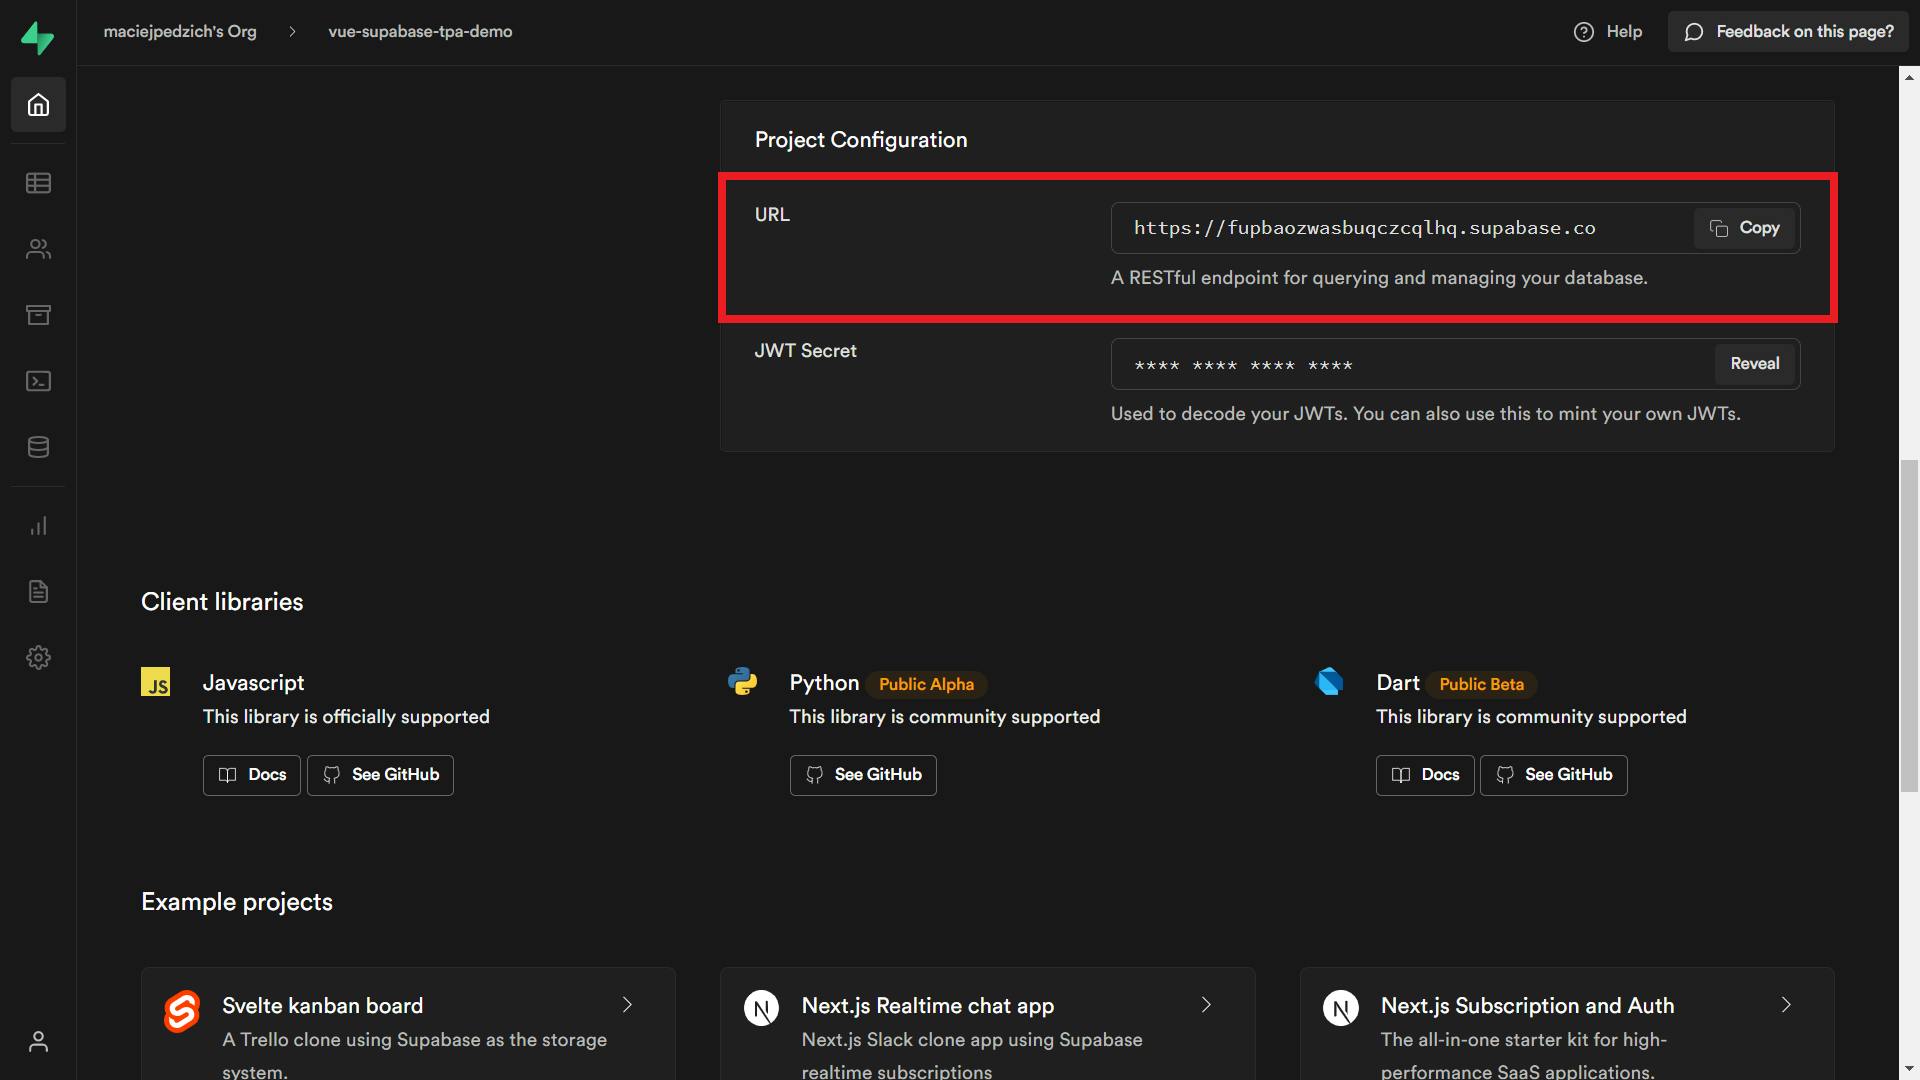
Copy that address to your clipboard and paste it back into Github's OAuth app form callback URL field. Then just add /auth/v1/callback and you should be ready to register your application! Here's a sample registration form I've filled in.
Entering Github credentials to the Supabase project
If you've successfully created your Github OAuth app, you should see something like this:
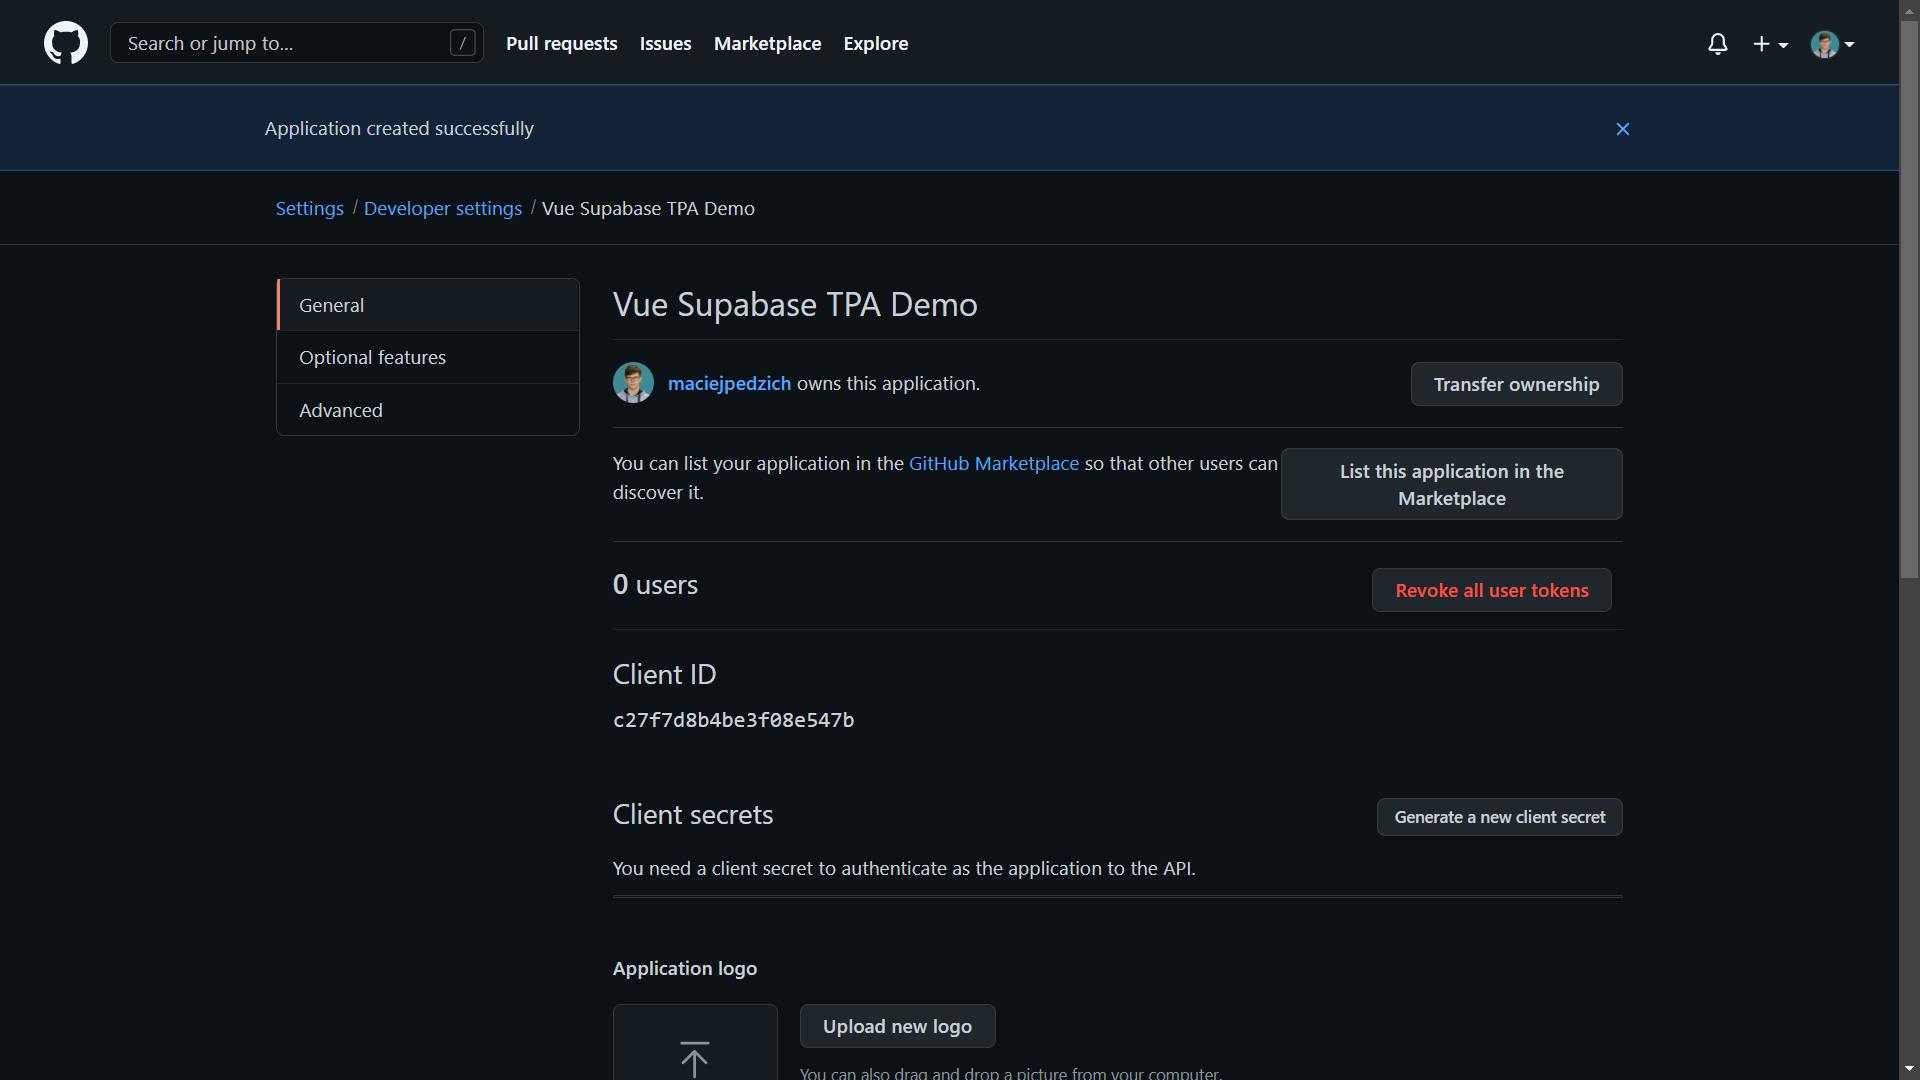
See that Generate a new client secret button? Smash it. Type in your password and you should be greeted with a steaming hot and fresh client secret. Be extremely careful not to reveal it to anyone, not even your dog, or I'll be very, very sad... you don't want that! But what you do want, is to copy said secret right now, because you'll never get to see it again.
Once it's in your clipboard, go back to your Supabase project's dashboard and click the cog (Settings) icon at the bottom of the sidebar on the left-hand side. Choose Auth Settings, scroll down to External OAuth Providers and toggle on Github enabled. All you have to do is to paste in the client secret and grab the client ID from the Github OAuth application's settings page.

Hit that Save button next to External OAuth Providers, and congratulations - you're done with Github OAuth setup!
Preparing our Vue 3 app
We still need to do some configuring, but this time it's on our Vue 3 project's side and it shouldn't take too long. To make your life a tad easier, I've removed unnecessary boilerplate from create-vue generated project and set up Prettier to work with ESLint. You just need to run the following in your CLI:
$ git clone https://github.com/maciejpedzich/vue-supabase-tpa-demo.git
$ cd vue-supabase-tpa-demo
$ git reset --hard d9191b85a1145f311437a9898f640b7a24c087f2
$ npm install
Running these commands will ensure that the current HEAD will be pointing to the blank canvas I've just described, so that you can properly code along with this tutorial. And of course, let's not forget about installing all the dependencies (this includes the official Supabase library for JavaScript).
Alright, now open up a code editor of your choice (VSCode FTW, don't @ me) and create a .env.local file in the application's root directory. Here we need to add the following variables:
BASE_URL=/
VITE_SUPABASE_URL=
VITE_SUPABASE_ANON_KEY=
BASE_URL is necessary to use Vue Router's history mode, whereas the other two variables will be used to configure our global Supabase client instance. VITE_SUPABASE_URL is the same one used for the Github OAuth App (except without the /auth/v1/callback part). As for the VITE_SUPABASE_ANON_KEY - go back to your project dashboard's home page and copy that anon public key under Project API keys section (see screenshot below) and then obviously paste it back into the file.

Because we're using TypeScript, it would be great to have some of that sweet, sweet ✨ IntelliSense ✨. Create a global.d.ts file (but in the src directory) with this handy little interface:
interface ImportMetaEnv {
  BASE_URL: string;
  VITE_SUPABASE_URL: string;
  VITE_SUPABASE_ANON_KEY: string;
}
And to finally wrap up our hard setup work, create a supabase.ts file in that same src folder with the following content:
import { createClient } from '@supabase/supabase-js';

const supabaseUrl = import.meta.env.VITE_SUPABASE_URL;
const supabaseAnonKey = import.meta.env.VITE_SUPABASE_ANON_KEY;

export const supabase = createClient(supabaseUrl, supabaseAnonKey);
By the way, iIf you don't believe me with the ImportMetaEnv step, just remove and retype the import.meta.env.* bits in supabase.ts to see autocomplete in action... and that's it for the overall setup! We can, at long last, start writing some of that actual code.
Designing a Pinia authentication store
 Photo by Pineapple Supply Co. on Unsplash
Let's kick off by creating said authentication store. Each Pinia store consists of 4 key elements:
- unique identifier in form of a string
- state object, AKA central part of a store. It's responsible for actually holding the data in one place
- getters, or a state that depends on the one we defined above. They behave pretty much like Vue's computed properties
- actions, which can be compared to Vue's methods, they're perfect for shaping business logic of a store
With these core components in mind, here's how I would design a global authentication store
- unique identifier:
auth(who would've thought!) - state: I can only think of the non-negotiable property called
currentUser, which holds either the user object ornulldepending on whether they're signed in or not - getters: I believe a simple
isAuthenticatedgetter is all we need here. As you may have guessed by now, this is for checking if the user has logged in based oncurrentUser's value - actions: again, I'm confident it only takes two in our case. I'm talking a
loadUsermethod for... well, populating our state with user data andclearUserfor deleting it
And here's how I would convert this specification into actual code:
import { defineStore } from 'pinia';

import { User } from '@supabase/supabase-js';
import { supabase } from '@/supabase';

type State = {
  currentUser: User | null;
};

type Getters = {
  isAuthenticated(): boolean;
};

type Actions = {
  loadUser(): void;
  clearUser(): void;
};

export const useAuthStore = defineStore<'auth', State, Getters, Actions>(
  'auth',
  {
    state() {
      return {
        currentUser: null
      };
    },
    getters: {
      isAuthenticated() {
        return !!this.currentUser;
      }
    },
    actions: {
      loadUser() {
        this.currentUser = supabase.auth.user();
      },
      clearUser() {
        this.currentUser = null;
      }
    }
  }
);
There's nothing particularly interesting going here - I've only defined type definitions for all of the aforementioned key elements in a store, supplied them to exported defineStore instance and then actually defined initial state values and both getters' and actions' behaviour.
The first two steps I've just described are especially useful while creating getters, because with an external Getters object type in place, we don't have to manually infer each getter's return type in each function's actual definition. We've already done that with said Getters type.
Creating a Sign in page
It's time to create a "Sign in" page. Since it's a minimal tech demo, all we need is a single "Sign in via Github" button, it speaks for itself really. Go to the views directory and create SignInView.vue file. I'll let you figure out how to write the <template> for this view 😉, but I'll guide you through the logic part, don't worry!
We could create an isSigningIn boolean ref (initially false) and a signIn function which sets it to true and calls Supabase client's own signIn method. Since it returns a promise which resolves with an object containing an error property that's either an Error or null, we would then need to throw it if it's the former. Upon catching said error, we should probably log it in the console and show an alert informing us about a failure. Finally, we can reset the aforementioned ref back to false.
This was the specification, so here's the actual implementation, because that's probably what you're after
import { ref } from 'vue';
import { supabase } from '@/supabase';

const isSigningIn = ref(false);

async function signIn() {
  try {
    isSigningIn.value = true;
    const { error } = await supabase.auth.signIn({ provider: 'github' });

    if (error) {
      throw error;
    }
  } catch (error) {
    console.error(error);
    alert('Something went wrong! Check the console for more details');
  } finally {
    isSigningIn.value = false;
  }
}
Friendly reminder that @/ is an alias for our project's src directory, if you haven't noticed already. Now all we have to do is to bind this method to our button's click event handler and also show a generic Please wait message when isSigningIn is true, all in the template. With all that combined, here's how the SignInView.vue file should look like:
<script lang="ts" setup>
import { ref } from 'vue';
import { supabase } from '@/supabase';

const isSigningIn = ref(false);

async function signIn() {
  try {
    isSigningIn.value = true;
    const { error } = await supabase.auth.signIn({ provider: 'github' });

    if (error) {
      throw error;
    }
  } catch (error) {
    console.error(error);
    alert('Something went wrong! Check the console for more details');
  } finally {
    isSigningIn.value = false;
  }
}
</script>

<template>
  <p v-if="isSigningIn">Please wait...</p>
  <button v-else @click="signIn">Sign in via Github</button>
</template>
Bear in mind that we can't visit the Sign in page just yet, as we haven't added a proper route record for it. Head over to the router directory and open index.ts. Now simply add the following object to the routes array:
{
  path: '/sign-in',
  name: 'SignIn',
  component: () => import('../views/SignInView.vue')
}
Lastly, just add a RouterLink to the /sign-in record we've just created, so that the HomeView.vue component looks like this:
<script lang="ts" setup>
import { RouterLink } from 'vue-router';
</script>

<template>
  <h1>Vue Supabase TPA Demo</h1>
  <RouterLink to="/sign-in">
    <p>Go to "Sign in" page</p>
  </RouterLink>
</template>
Loading user data in our app
If you were wondering why we haven't used the authentication store yet, I was just waiting for an appropriate moment, and that moment is right now. Let's move over to App.vue in the src folder.
As you (hopefully) remember from one of the previous sections, we've defined a loadUser method in our global authentication store to, well, load user data. In order for us to be able to call it in our component, we obviously need to import and use said store in the component. It all boils down to:
import { useAuthStore } from '@/stores/auth';

const authStore = useAuthStore();

authStore.loadUser();
There is, however, one more situation when we have to repopulate currentUser, and I'm talking redirect after successful authentication. Luckily, Supabase has got use covered with its auth.onAuthStateChange method, which allows us to execute a function whenever an auth event occurs, such as SIGNED_IN. Here's a code sample:
import { supabase } from '@/supabase';

supabase.auth.onAuthStateChange((event) => {
  if (event === 'SIGNED_IN') {
    authStore.loadUser();
  }
});
And if we combine these two snippets together, we should have the following in App.vue:
<script setup lang="ts">
import { RouterView } from 'vue-router';

import { supabase } from '@/supabase';
import { useAuthStore } from '@/stores/auth';

const authStore = useAuthStore();

authStore.loadUser();

supabase.auth.onAuthStateChange((event) => {
  if (event === 'SIGNED_IN') {
    authStore.loadUser();
  }
});
</script>

<template>
  <RouterView />
</template>
Creating a minimalist User Profile view
We've figured out how to populate our store with user data, so let's put it to some actual use. What better way to showcase it in action than the aforementioned Profile page? I'm positive only the user name and Github avatar are enough for this demo. I would also throw in a link back to the home page so as to create a feel of all the views being connected.
As always, with proper specs in place we can write proper code. Create a ProfileView.vue file in the views directory with the following content:
<script lang="ts" setup>
import { RouterLink } from 'vue-router';

import { User } from '@supabase/supabase-js';
import { useAuthStore } from '@/stores/auth';

const authStore = useAuthStore();

const { user_metadata } = authStore.currentUser as User;
const { avatar_url, user_name } = user_metadata;
const avatarAltText = `${user_name}'s avatar`;
</script>

<template>
  <h1>{{ user_name }}</h1>
  <img :src="avatar_url" :alt="avatarAltText" />
  <RouterLink to="/">
    <p>Take me back home</p>
  </RouterLink>
</template>
Bear in mind that both the avatar_url and user_name properties of user_metadatamay only be available for Github users only, so you'll probably have to modify the code for different authentication providers. Also, make sure to add a route record for our newly created view:
{
  path: '/profile',
  name: 'Profile',
  component: () => import('../views/ProfileView.vue')
}
Right before we move on the the next section, let's go back to the HomeView.vue for a minute. It would be neat to have that RouterLink change its destination depending on the isAuthenticated getter. For that, we'll need a computed property that is set to Profile if we're authenticated and SignIn otherwise. We should display it in said RouterLink's text too... you know the drill:
<script lang="ts" setup>
import { computed } from 'vue';
import { RouterLink } from 'vue-router';

import { useAuthStore } from '@/stores/auth';

const authStore = useAuthStore();

const routerLinkDestination = computed(() =>
  authStore.isAuthenticated ? 'Profile' : 'SignIn'
);
</script>

<template>
  <h1>Vue Supabase TPA Demo</h1>
  <RouterLink :to="{ name: routerLinkDestination }">
    <p>Go to {{ routerLinkDestination }} page</p>
  </RouterLink>
</template>
Writing a global authentication route guard
Now we need to protect our brand new Profile route (and all the future ones) from being visited without signing in first. We could assign it an authRequired boolean flag in its meta object, which we would then check in the auth guard, along with authStore.isAuthenticated getter. If the former is set to false or both are true, proceed with the navigation. Otherwise, redirect user to the SignIn page.
Just before we take care of that guard, I would also love some precious ✨ IntelliSense ✨ for the aforementioned meta object. Add this types.d.ts file directly in the src folder:
import 'vue-router';

declare module 'vue-router' {
  interface RouteMeta {
    authRequired: boolean;
  }
}
Then create a guards directory (in src of course) with an auth.ts file:
import { RouteLocationNormalized, NavigationGuardNext } from 'vue-router';
import { useAuthStore } from '@/stores/auth';

export function authGuard(
  to: RouteLocationNormalized,
  from: RouteLocationNormalized,
  next: NavigationGuardNext
): Promise<void> | void {
  const authStore = useAuthStore();

  if (!to.meta.authRequired || authStore.isAuthenticated) {
    return next();
  } else {
    return next({ name: 'SignIn' });
  }
}
All you have to do now is to add meta objects to each route and register the above as the global beforeEach guard:
import { authGuard } from '@/guards/auth';
import { createRouter, createWebHistory } from 'vue-router';
import HomeView from '../views/HomeView.vue';

const router = createRouter({
  history: createWebHistory(import.meta.env.BASE_URL),
  routes: [
    {
      path: '/',
      name: 'Home',
      meta: { authRequired: false },
      component: HomeView
    },
    {
      path: '/sign-in',
      name: 'SignIn',
      meta: { authRequired: false },
      component: () => import('../views/SignInView.vue')
    },
    {
      path: '/profile',
      name: 'Profile',
      meta: { authRequired: true },
      component: () => import('../views/ProfileView.vue')
    }
  ]
});

router.beforeEach(authGuard);

export default router;
Signing out of the app
This is the last feature that's yet to be implemented, if you discount the incoming BONUS. We just have to add a Sign out button that's visible only if the user's authenticated. Upon clicking it should sign them out of Supabase and reset authStore.currentUser back to null. Let's do that in HomeView.vue:
<script lang="ts" setup>
import { computed } from 'vue';
import { RouterLink } from 'vue-router';

import { useAuthStore } from '@/stores/auth';
import { supabase } from '@/supabase';

const authStore = useAuthStore();

const routerLinkDestination = computed(() =>
  authStore.isAuthenticated ? 'Profile' : 'SignIn'
);

const signOut = async () => {
  await supabase.auth.signOut();
};
</script>

<template>
  <h1>Vue Supabase TPA Demo</h1>
  <RouterLink :to="{ name: routerLinkDestination }">
    <p>Go to {{ routerLinkDestination }} page</p>
  </RouterLink>
  <button v-if="authStore.isAuthenticated" @click="signOut">Sign out</button>
</template>
And to clear user data from our store, go back to App.vue and modify supabase.auth.onAuthStateChange line like so:
supabase.auth.onAuthStateChange((event) => {
  if (event === 'SIGNED_IN') {
    authStore.loadUser();
  } else if (event === 'SIGNED_OUT') {
    authStore.clearUser();
  }
});
If you've done everything correctly, I can safely say...
... or have you? Well, technically yes, but coding the upcoming feature will give you extra points for better end-user-experience, as well as a showcase of Pinia's action subscriptions.
BONUS - custom redirects upon successful login
Right now, if you're not authenticated but would like to visit /profile, you'll be taken to /sign-in. However, when you log back in, you'll be redirected to the home page instead. It would be really convenient for you to be taken to the page you had initially wanted to enter.
Plan A - taking advantage of Supabase's redirectTo option
If you've dug into Supabase's JS client auth docs, chances are you've come across the redirectTo option of the signIn method. It allows us to specify a custom URL that you'll be taken to upon successful authentication.
So the idea could be to add a query parameter called, say... redirect to SignIn back in the aforementioned guard...
return next({
  name: 'SignIn',
  query: {
    redirect: to.fullPath
  }
});
... to then craft a full redirectTo URL over in SignInView.vue's signIn function like this:
import { ref } from 'vue';
import { useRoute } from 'vue-router';
import { supabase } from '@/supabase';

const isSigningIn = ref(false);

async function signIn() {
  try {
    isSigningIn.value = true;

    const redirectPath = (route.query.redirect as string) || '/';
    const redirectTo = `${window.location.origin}${redirectPath}`;
    const { error } = await supabase.auth.signIn(
      { provider: 'github' },
      { redirectTo }
    );

    if (error) {
      throw error;
    }
  } catch (error) {
    console.error(error);
    alert('Something went wrong! Check the console for more details');
  } finally {
    isSigningIn.value = false;
  }
}
If you were try try out this solution by going to /profile unauthenticated and signing back in... you'll be taken to the SignIn screen again! But why does it happen?
It's (most likely) got to do with the fact that our authentication guard gets executed before Supabase client's onAuthStateChange callback, meaning the authentication check is performed while the store hasn't been populated yet. So the question is: how can we guarantee loading of user data before hitting the guard?
Plan B - expanding the store and using Pinia's $onAction method
An ideal solution would involve triggering navigation after calling a store action to ensure user data presence before the authentication challenge. This is totally possible, yet requires us not only to manually redirect the user to initially desired page, but also to store said page information ourselves.
I would add a redirectRoute state property which would hold either a RouteLocation object or null, as well as three actions for managing it: save, load, and clear (all suffixed with RedirectRoute obviously). When the auth guard runs and the user's not authenticated, I would call save to extract and save an object with name, params, query, and hash of the desired route to localStorage before sending our user to the SignIn page. Once back in the app after a successful signin, I would then call loadRedirectRoute right after loadUser in the supabase.auth.onAuthStateChange callback's SIGNED_IN event, so as to grab and parse said route object.
Here's where Pinia's $onAction method comes into play. It allows us to watch actions and their results, and also execute a callback after an action's finished executing or thrown an error, all thanks to after and onError hooks respectively. In our case, we can check if the action name is loadRedirectRoute and then utilise the former hook to check if redirectRoute is not null, in which case we can finally perform a redirect and remove route object from both our store and localStorage.
That's quite a specification, but it's not too difficult to implement! Make sure to revert changes made in Plan A, and open the authentication store. Begin by adding described state...
{
  currentUser: null,
  redirectRoute: null
}
... and actions:
{
  /* ... */,
  actions: {
    /* ... */
    saveRedirectRoute(route: Partial<RouteLocation>) {
      const { name, params, query, hash } = route;

      localStorage.setItem(
        'redirectRoute',
        JSON.stringify({
          name,
          params,
          query,
          hash
        })
      );
    },
    loadRedirectRoute() {
      const route = JSON.parse(
        localStorage.getItem('redirectRoute') || 'null'
      ) as Partial<RouteLocation> | null;

      this.redirectRoute = route;
    },
    clearRedirectRoute() {
      localStorage.removeItem('redirectRoute');
      this.redirectRoute = null;
    }
  }
}
Of course, don't forget to update State and Actions types and to import the RouteLocation interface. In case you didn't know, Partial is a built-in utility type which marks all properties of given type as optional. Here we take advantage of it for the saveRouteRedirect action, since we only need four properties of the target route object.
import { RouteLocation } from 'vue-router';

type State = {
  currentUser: User | null;
  redirectRoute: Partial<RouteLocation> | null;
};

type Getters = {
  isAuthenticated(): boolean;
};

type Actions = {
  loadUser(): void;
  clearUser(): void;
  saveRedirectRoute(route: Partial<RouteLocation>): void;
  loadRedirectRoute(): void;
  clearRedirectRoute(): void;
};
Alright, now go to the auth guard and add saveRedirectRoute action call like so:
if (!to.meta.authRequired || authStore.isAuthenticated) {
  return next();
} else {
  authStore.saveRedirectRoute(to);
  return next({ name: 'SignIn' });
}
And last but not least, the App.vue file:
supabase.auth.onAuthStateChange((event) => {
  if (event === 'SIGNED_IN') {
    authStore.loadUser();
    authStore.loadRedirectRoute();
  } else if (event === 'SIGNED_OUT') {
    authStore.clearUser();
  }
});

authStore.$onAction(({ name, store, after }) => {
  if (name === 'loadRedirectRoute') {
    after(async () => {
      const redirectRoute = store.redirectRoute;

      if (redirectRoute) {
        await router.isReady();
        await router.replace(redirectRoute as RouteLocationRaw);
        authStore.clearRedirectRoute();
      }
    });
  }
});
Notice the use of router.replace instead of your regular router.push. As the name suggests, it swaps the current history entry with a new one based on provided RouteLocationRaw object (it's compatible with RouteLocation). Thought it was appropriate to do given that we want to achieve that custom redirect effect. Ok then...
IT'S A WRAP! - Github repo link
... or have you? You have, I'm just messing with you now, hahaha. Thank you for staying with me until the very end, you're an absolute legend. You can find the whole source code for this repository below:
vue-supabase-tpa-demo on Github
Take care!